The Zwift Tron Bike: HACKS TO UNLOCK QUICKER!

January 18th, 2024 by JoAnn Cranson

By:  Jay Campbell

If you are a Zwifter, you may have experienced a bit of bike-envy when a glowing-neon-bike came in and out of your view. [A “Zwifter” is a user of Zwift, “… a massively multiplayer online cycling and running physical training program that enables users to interact, train and compete in a virtual world.” -Wikipedia] That neon bike is commonly known as the “Tron” bike and formally referred to as the “Zwift Concept Z1 Bike.” It is colorful and it is fast. This article will divulge some hacks to unlock your Tron Bike quicker.

Author’s avatar on his Zwift Concept Z1 (Tron) bike on top of the Radio Tower climb with Alpe du Zwift in the background. He accumulated 65% of the 164,000 feet of elevation in the final 7 weeks. The hacks enabled increased weekly-elevations of 7113, 6115, 14547, 16710, 15925, 21512, and 24540 feet. Image used by permission of Zwift.com.

There are some basics to “unlocking” the Tron bike that I will not cover in detail. For example, you need to sign up for the Everest Challenge (I wish someone had told me that three years ago). Those basics have been covered by others [https://zwiftinsider.com/tron-bike/].

The main requirement to unlock the Tron is the accumulation of 50 kilometers of climbing…. that’s 164,042 feet. If you rode the Tempus Fugit route every day (52 feet of climb) it would take you 3,155 days. If you rode the Road to Sky route every day (3428 feet) it would take you 48 days.

Another way to look at this is … How much time would it take to accumulate 164,042 feet at a given speed on a given slope? For example, 10 mph up a 5% slope equals 0.5 miles-of-climb-per-hour or 2640 feet-per-hour.

Vup = V x slope — [Rate-of-Climb = bike velocity x slope]

That Rate-of-Climb would require 62 hours to unlock the Tron bike. From this you can see that getting the Tron bike is not an impossible task if you ride some hilly routes (not Tempus Fugit). But before we talk about routes, let’s talk about the physics.

Your pedal power (watts) that moves your Zwift avatar is expended (for simplification) in three ways: 1) changing elevation, 2) rolling and frictional losses and 3) aero drag losses.

The power required to maintain a specific Rate-of-Climb is easy to calculate.

Equation (i): Pup = Vup x m x g — [power = Rate-of-Climb x mass x gravitational constant]

For example, take the 10 mph on a 5% slope discussed above with the cyclist+bike weighing 70 kg. This becomes:

0.5 mph x .447 (M/s)/mph x 70 kg x 9.8 M/s2 = 153 watts (NM/s)

This is the minimum wattage needed to maintain that Rate-of-Climb. More power is needed to overcome the frictional, rolling, and aero losses. Those losses are a function of velocity (the losses are smaller at lower velocities). We will talk about that in a minute, but let’s take one last look at Equation (i) written a different way:

Vup = Pup/(m x g)

To maximize Rate-of-Climb, Vup, we want to maximize power and minimize mass (g is a constant). Hey… that’s watts per kilo! Now you understand the cyclist’s obsession with watts per kilo. For a climber, it is all about watts per kilo. In fact, you can quickly calculate your theoretical vertical speed in feet per hour by multiplying your watts per kilo* by the conversion factor of about 1200. For example, 2.0 w/kg* converts to 2400 feet per hour of elevation gain.

[*Note that throughout this article, “m” or “mass” is the combined weight of cyclist and bike. The “w/kg” numbers all use that definition of “mass.” The “w/kg” reported by Zwift on their data displays does NOT include the weight of the bike. To compare your w/kg with the data in this blog, you must add a bike weight. Zwift does not disclose the weights of their frames and wheels. I have used a climbing-bike weight of 15.7 lbs (7.1 kg) which was the average bike weight at the 2021 Tour de France. (See Table 4.) Strangely, the Rates-of-Climb I measured on Zwift are faster than theoretically possible by a few percent. Perhaps my bike set up is lighter than 15.7 lbs or I was inputting more power than the erg setpoint? We know Zwift uses the weight of the bike in their algorithm. See link in next paragraph.]

Maximizing power and minimizing weight is so logical, that equations are superfluous, but now you have a feel for what the Zwift engine is doing. To minimize mass you could lose some weight, but I will leave that up to you. You should go to your “Zwift Garage” and select the lightest frame and wheelset available. This has been written about by others here: https://zwiftinsider.com/fastest-bike-alpe/

To further maximize your Rate-of-Climb, Vup, you would like the majority of your power expended on elevation gain and not expended on rolling and aero resistances. To keep rolling and aero resistances small, you want your velocity low, which means picking the steepest climbs possible. Others have discussed the optimal Zwift routes (see https://zwiftinsider.com/easiest-tron/ ), but my experience is that the climb to the Radio Tower is best for highest Rate-of-Climb. The Radio Tower climb is consistently over 10% slope so V is low, meaning that most of your power is going into elevation gain.

Rates-of-Climb (ft/hr) on Radio Tower for various w/kg* are shown below. In most instances, the Rate-of-Climb exceeded the theoretical maximum. I can’t explain why that is happening, but it does confirm that the Zwift algorithm calculates the losses due to friction, roll and drag to be very small.

Table 1. Riding up the 450 foot climb of Radio Tower from bottom of Bowl (more data in Figure 1):

watts/kg* Rate-of-Climb Theoretical % Diff
1.59 1970 ft/hr 1908 ft/hr -3.3%
2.38 3066 ft/hr 2856 ft/hr -7.4%
3.04 3778 ft/hr 3648 ft/hr -3.6%

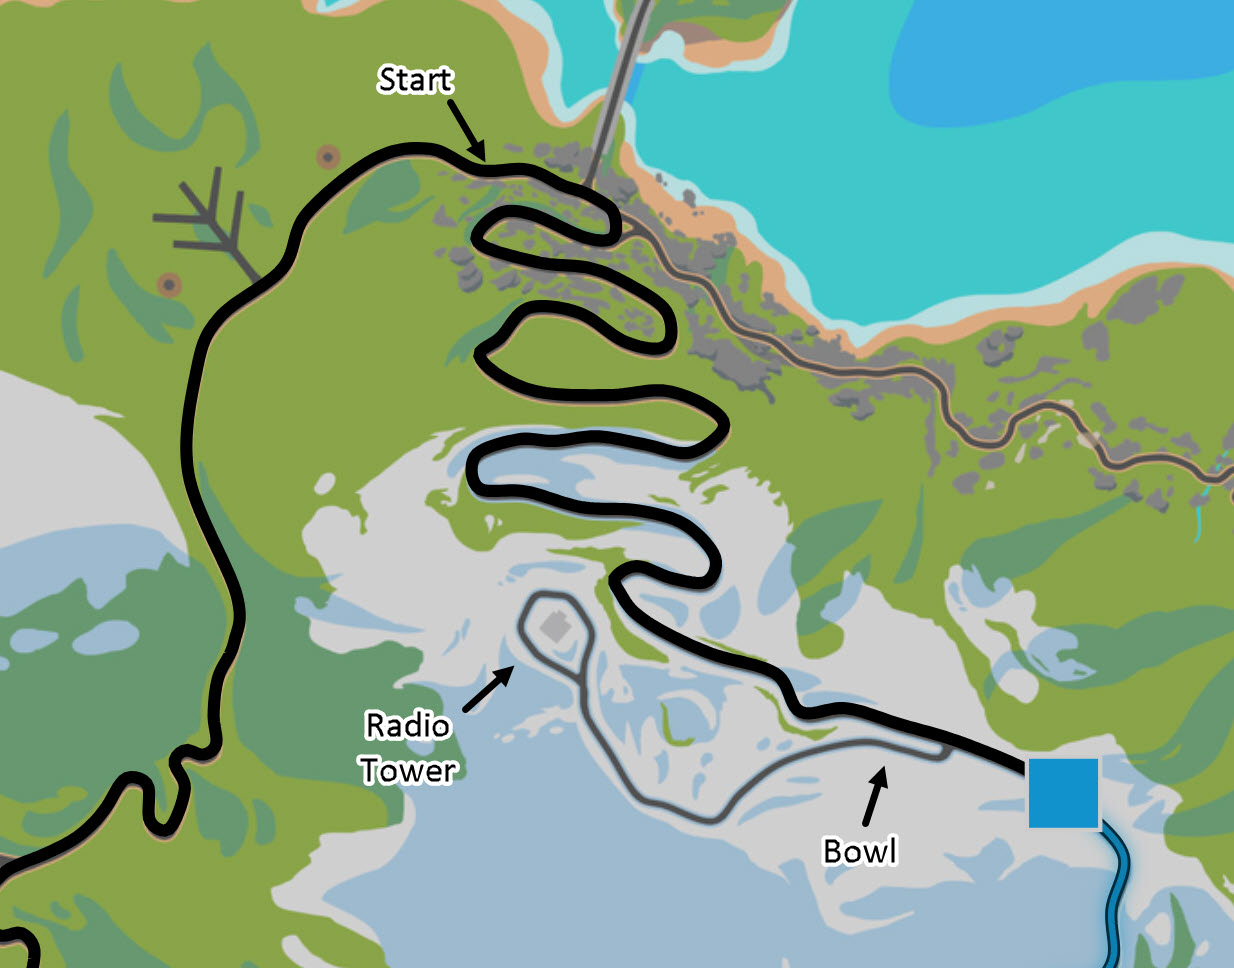
Reverse Epic KOM climb, Bonus Climb (Radio Tower), and “Bowl”. Base Image used by permission of Zwift.com.

HACK #1

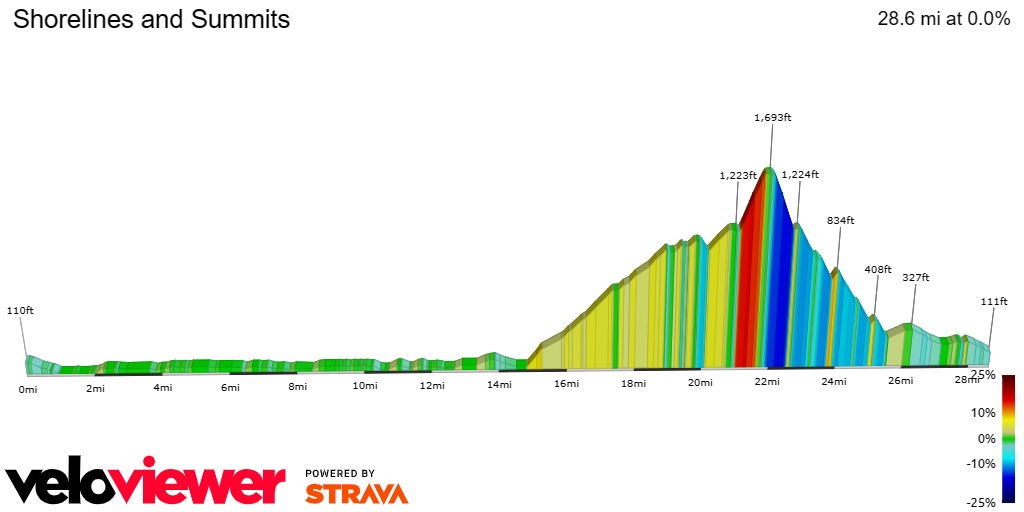
2D Elevation of Shorelines and Summits Route. Hack#1 starts at about the 26-mile marker and proceeds in reverse, up the Epic KOM to the Radio Tower. Used by permission of VeloViewer powered by Strava. See full details here.

The best way to get to the Radio Tower climb and still get in some climbing on the way is to select the Jungle Circuit Route. Do an immediate U-turn. Within the next minute you will get an intersection warning. Select to go right onto the Reverse Epic KOM climb. In about a minute you are into good climbing, with no power wasted on flats or downhill.

You will be using the U-turn function a lot in my hacks, so figure out how to use it effectively. I use the down arrow on my keyboard which is easily reachable. The key needs to be held for a second or two before the turn is executed.

HACK #2

Create a custom workout for your climbs and execute in erg mode. This will enable you to maintain a normal cadence and prevent you from overdoing it. A link to a custom workout that works for a wide variety of riders is given at the end of this article. It is mostly in Zone 2. Long aerobic workouts are best for accumulating elevation day after day.

HACK #3

When you get to the top of Epic KOM via the reverse route (~1100 feet of climbing) you will take a right turn onto what is called “Bonus Climb” or more commonly the Radio Tower. This is about 500 feet of very steep climbing. I usually do a U-turn as soon as the slope drops below 10% near the top of the climb, head back to the bottom, U-turn at the bottom and do it again, and again, and again.

Table 2. Riding up and down Radio Tower (the complete loop):

watts/kg* Rate-of-Climb
1.59 1997 ft/hr
2.38 2953 ft/hr
3.04 3617 ft/hr

A “custom Zwift workout” could consist of alternating blocks of “climbing” and “descending.” You want to expend energy on the climb and save it on the descent. Make the blocks longer than it will actually take you to climb or descend, then make use of the “Tab” key. The “Tab” key skips to the next block. For example: create two blocks of 15 minutes @ 80% ftp and 2 minutes @ 40% ftp. If you get to the top in 9:09 (at 80%ftp), U-Turn, and hit the Tab key to skip to the descend block. When you are done descending and are climbing again, hit the Tab key to skip to the next “climbing” block.

HACK #4

Do you remember your physics lessons on potential energy conversion to kinetic energy? Usually, the teacher released a ball at the top of a ramp. The ball accelerated as it descended. Maybe there was an up-ramp abutting the down-ramp. The ball ascended the up-ramp, stalled, descended again, then oscillated between the two ramps. Without frictional and rotational losses, the ball could oscillate forever as potential energy is converted to kinetic energy and back, much like skateboarders with their half-pipes. If you could find two opposing ‘ramps’ in the Zwift world, could you accumulate more feet of climbing by oscillating back and forth than by doing a long climb like Radio Tower?

Equation (ii) for a frictionless ramp shows that a doubling of the slope will double the Rate-of-Climb. Doubling the height of the incline (making the ramp longer) only increases the Rate-of-Climb by 21/2.

Equation (ii): Rate-Of-Climb = (g/8)1/2 x s x (H)1/2 — where H is the vertical height of the incline, s is slope and g is gravitational constant

For example, a ramp of 11% slope and a height of 21 feet gives a Rate-of-Climb of 3637 ft/hr. [Note this is approximately the conditions of the 1.59 w/kg* experiment in Table 4, which had a Rate-of Climb of 3792 ft/hr.]

There is an interesting “Bowl” (two-sided-ramp) at the start of the Radio Tower climb. Both sides have maximum slopes greater than 12%. I tested this “Bowl” at several w/kg*.

Table 3. Rate-of-Climb in Bowl vs. Radio Tower Loop:

watts/kg* Rate-of-Climb in Bowl Advantage vs Up/Dwn Radio Tower at same w/kg Theoretical w/kg for this Rate-of-Climb
1.59 3792 ft/hr 90% 3.2 w/kg
2.38 4704 ft/hr 59% 3.9 w/kg
3.04 5548 ft/hr 53% 4.6 w/kg

To my shock, I accumulated almost 60% more feet in elevation per hour by cycling back and forth across this bowl than going straight up and down the Radio Tower! To get that rate-of-climb using equation (i) would require 3.9 w/kg (for me that equates to 265 watts or 126% of my ftp!) At 1.59 w/kg the results were even more astounding: a 90% increase in Rate-of-Climb! The lower speeds at lower w/kg correspond to less aero and rolling losses. Conversely, if you do this Bowl at higher w/kg, you will experience less advantage, but it will still be worth implementing the Hack.

HACK #5

There is something very interesting about Equation (ii) … “mass” does not appear in this equation! This would indicate that riding the bowl should not be adversely affected by a heavier bike? In fact, high speeds are attained at the bottom of the bowl where aerodynamics come into play. You can take advantage of this by switching to a heavier aero frame and wheels when you get to the Bowl. Switching bikes in-game is easy to do. [See www.zwiftinsider.com/change-bikes-quickly/]

I confirmed this in a test with two different bikes in the Bowl. [Note…My choice of equipment was limited by what was in my garage (many frames and wheels are level-locked).] The Time Trial bike’s Rate-of-Climb was over 7% more than the Climbing bike … over 300 extra feet per hour! To achieve either of those Rates-of-Climb on a normal uphill would require around 4 watts/kg!

Table 4. Aero vs Lightweight in the Bowl

Set-Up Lightweight Climbing Time Trial Aero
Frame Cannondale EVO Canyon Speedmax
Frame Zwift Aero Stars 2 4
Frame Zwift Weight Stars 4 1
Wheels Zipp 353 NSW Zipp 454
Wheels Zwift Aero Stars 3 4
Wheels Zwift Weight Stars 3 3
Assumed weight for w/kg 7.1 kg 9.1 kg
Power Input 70% ftp 70% ftp
Watts/kilogram* 2.22 2.16
Rate-of-Climb in Bowl 4493 ft/hr 4824 ft/hr

CONCLUSION

Unlocking the Tron Bike is one of the coolest achievements on Zwift. These hacks can get you there quicker. Using Figure 1 you can predict how many hours it will take you to get there. If you can maintain 3 w/kg, your RoC on the Radio Tower climb is about 4000 ft/hr. You can accumulate the 164,000 feet in 41 hours. Interestingly, if you can only maintain 1.5 w/kg, but you spend your time in the ‘Bowl,’ you have about the same RoC.

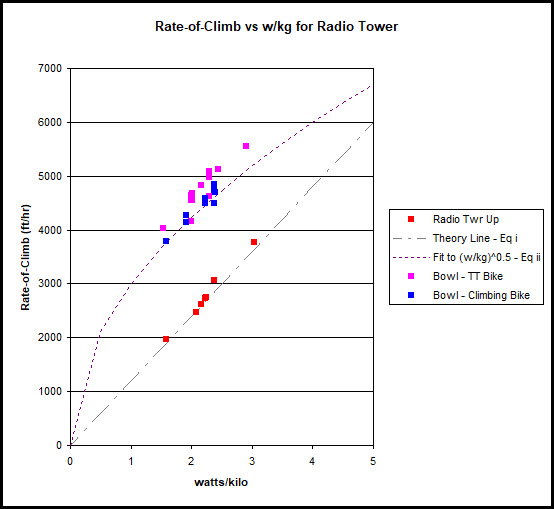
Figure 1. Rate-of-Climb for different scenarios


In the process of learning about these HACKS and why they work, I hope I have refreshed your understanding of some of the physics of cycling. Knowing the science can help you bike smarter.


==============================================================

*All references to “w/kg” include the weight of the bike and are not directly comparable to “w/kg” reported on the Zwift data screens which only includes the weight of the rider. To convert, multiply the Zwift number by (cyclist kg)/(cyclist+bike kg).

CUSTOM ZWIFT WORKOUT

I have created a workout that leads you through the HACKS. You can download it from here:

https://www.dropbox.com/scl/fi/tefhztfep6vvivw2xus45/Jungle_Circuit-Tron_Hacks-V01-02.zwo?rlkey=x0wyynfi8mrm2qpydg2bl8fi3&dl=0

After you have downloaded it, save it to Documents/ZwiftWorkouts/[YourZwiftID] and then start Zwift. [If you are having trouble, video instructions are here: Importing Custom Workouts – Instructions | Zwift] This workout is called Jungle Circuit-Tron Hacks-V01-02 and will now appear under the “Custom Workouts” category in the workouts list. It is designed to be ridden in “erg” mode on the JUNGLE CIRCUIT route in Watopia.

Do not be alarmed at the “length” of the workout. It is made to suit a wide variety of riders. You will be “tabbing” through some of the long blocks. If you are a less powerful rider you will be instructed to “tab” (skip) many of the blocks. Most riders will get the full experience in 60 minutes.

You will need access to a keyboard to use the workout effectively. Here are the keyboard shortcuts to know:

Action Keyboard Shortcut
U-Turn Down Arrow (Press and Hold)
Select turn at upcoming intersection Right Arrow
Skip out of current workout block Tab
Stop Game to change bikes A
Open Garage to select frame and wheels T

Ross DiFalco

February 8th, 2023 by Athletic Mentors Staff
Posted in:

Beyond The Gravel

October 20th, 2022 by JoAnn Cranson

Photo by: Laura Caprara

By:  Christina Vipond

The first time I raced Uncle John’s Gravel Race, I was tooling along by myself about 16 miles per hour thinking I was going really fast. I climbed the hill to the finish line expecting champagne to be sprayed all over me and saw what looked like 1000 racers who had already finished. 

Lesson:1  I wasn’t “really fast”. Lesson 2: I had a lot to learn about racing.

The Michigan Gravel Race Series provides a great opportunity to experience different courses. Melting Mann kicked off the season with an overnight rain and drop in temperature which made for a chilly and leg zapping peanut butter road ride. A very nice volunteer was excited to tell me I only had 10 miles left. I tried to hide my true emotions with a smile and a thank you. 

Photo by: Laura Caprara

Barry welcomed us with a snowy start and a new, uphill finish. Lowell-it’s always nice to get to the bridge. I had to miss Hart Hills this year due to mechanical issues with both bikes at the same time. A racer can never have too many backup bikes. Waterloo was memorable with  lots of water bottle sucking potholes. The Cow Pie Classic added a 2nd farm, those trails always add adventure. Arcadia Grit and Gravel and Lord of the Springs are short but both pack a powerful punch. This year’s MGRS season ended with Uncle John’s and a new, straight up the grassy hill climb for the finish. The MGRS awards were held at the Moran 166. Although this  wasn’t part of the long or short course, it was the final ultra race. The 66 mile course was beautiful with leaves just beginning to turn and racers talked non stop about the infamous snowmobile trail. The weather was perfect, it was a great way to end the series. 

Photo by: Rob Meendering

It doesn’t take long to recognize the same faces at the races. The men are always helpful with “hop on my wheel” and “hey, we raced together at ___”.  Rob Meendering is always in the middle of the road, shouting encouragement as he captures the action. As nice as all that is, there seems to be a special bond with the women.  As competitive as the women are, they are also very encouraging.  There is chit chat during warm up rides, wishing each other good luck and a safe ride.  Some of my biggest competitors are some of my greatest friends. We stay at each other’s houses during race weekends, ride together for fun and share stories about our families. I was talking with another female racer about the relationships we build, she said her husband, who also races, just doesn’t understand it. For many of us, it goes beyond the gravel. 


What is FTP in Cycling?

September 7th, 2022 by JoAnn Cranson

By: Raquel Torres

FTP in Cycling. Definition & Tips

Function Threshold Power (FTP) is a measure of your cycling fitness and ability to maintain a high but manageable power output for a somewhat lengthy duration. From a physiological perspective, it’s the cycling power you produce when your lactate production has risen, leveled off, and then closely matches your body’s ability to remove lactate. This just barely keeps that lactate flooding at bay. In cycling, FTP is that gray area between the power you can sustain for a very long duration, typically an hour, and the fleeting power you can only tolerate for a couple of minutes.

The term FTP it’s a measure of the best average power output you could sustain for 1 hour in a time-trial scenario.

Why is FTP seen as important? 

The concept of FTP was developed by Dr Andrew Coggan, co-author of Training and Racing with a Power Meter

“Power at lactate threshold is the most important physiological determinant of endurance cycling performance, since it integrates VO2 max, the percentage of VO2max that can be sustained for a given duration, and cycling efficiency,” says Andrew Coggan

“As such, it is more logical to define training zones relative to an athlete’s threshold power vs., for example, power at VO2 max.” 

Lactate threshold and FTP aren’t the same thing (while VO2 max is the measurement of the maximum amount of oxygen your body can use during intense exercise). Lactate threshold refers to a specific physical change in the body. It is the point at which lactate begins to increase exponentially in your blood. Your lactate threshold can only be truly determined through blood tests.

Coggan says that lactate threshold and FTP are closely related. One is reflective of the other. FTP is the maximum power you can maintain while your body can still clear excess lactate being produced by your working muscles, allowing you to sustain your effort. 

In other words, FTP is the balance point between energy supply and demand among your aerobic and anaerobic energy systems

When you are cycling at low intensities, you are using your aerobic system. The aerobic system uses oxygen to metabolize fuel to create the needed energy. When your aerobic system can meet the energy demands of your muscles, there’s less contribution from your anaerobic energy system.

However, when cycling at higher intensities, the anaerobic system contributes more. The anaerobic system metabolizes fuel sources without oxygen. It creates energy much faster but for a shorter time. Continue to ride at a high intensity, and the byproducts of the anaerobic system (lactic acid) overwhelm your ability to clear them. So your breathing increases, the legs start to burn, and your time at this power output becomes minimal.

 Functional Threshold Power is the harmony between Aerobic & Anaerobic energy systems.

FTP and training

This context is vital for training as well because the difficulty of cycling workouts needs to be scaled to your current fitness level. A structured training plan progressively trains the energy systems needed to grow your fitness. Using cycling power zones, each workout in a plan is designed to provide just enough training stimulus to drive the adaptations that make you a faster cyclist.

What Equipment Do You Need to Test FTP?

You need a power meter on your bike or a smart trainer with an integrated power meter to measure FTP. Essentially, you just need a bike with some kind of power meter, it measures how hard and fast you pedal, giving you a figure in Watts.

There are various kinds of cycle power meters that attach to your bike and examples include SRM, Stages and Garmin. If you don’t have one of these (they can be expensive) you might consider using a static gym bike that measures power, such as the WattBike.

Another option is to mount your own bike to an indoor trainer that measures power, such as the Tacx Bushido Smart or the CycleOps Magnus Trainer.

The Best Way To Test Your FTP

One of the best-known testing methods is a 20-minute test (Critical Power 20 Test or CP20). You’ll ride at your highest sustainable power for 20 minutes. Your FTP is 95% of the average power during this interval. 

This is simply a 20-minute time trial where you ride as hard as you can while measuring your average power output.

Once you know your average power for 20 minutes (for example 200 watts) you can multiply it by 95% to estimate your FTP. For example: if your CP20 power output is 200 watts, a good estimation of your FTP would be 190 watts. This method is surprisingly accurate.

Other Things To Consider After Measuring Your FTP

In addition to testing your FTP, it’s important to measure your body weight at around the same time. This is so you can look at your FTP power output in terms of your power to weight ratio. Otherwise, any gains in your power output might be offset by gains in your body weight in a real-world setting.

You can easily work out your power to weight ratio. Divide your FTP power output by your body weight in kgs. For example, if your body weight is 70kg and your FTP is 200 watts, your FTP power to weight ratio would be 2.86 watts per kilo.

Power-to-weight ratio is a measurement of your power on the bike, in comparison to your body weight. It is expressed as watts of cycling power produced per kilogram of body weight, abbreviated as W/kg. 

Larger or bigger riders tend to have more watts than smaller cyclists in absolute terms, but lighter riders require less energy to overcome inertia and propel themselves forward (especially uphill). Power-to-weight ratio thus offers a fairer way to compare different riders’ abilities than by looking at power alone. 

How To Set Your Power Training Zones

Once you know your FTP, you can set your own power training zones by using various online calculators such as online software like Training Peaks or Garmin Connect. They have training zone calculators that you can use. Or you can hire a well experienced coach. 😉

Raquel Torres, MBA

www.raqueltorres.org

USAT- Youth Junior Elite Coach Certified

Other Sources:

https://www.trainerroad.com/blog/power-to-weight-ratio-for-cyclists-when-watts-kg-matters-and-how-to-improve-it/

https://www.myprocoach.net/blog/ftp-test-how-to-measure-your-cycle-performance/

https://www.trainerroad.com/blog/what-ftp-really-means-to-cyclists/

https://road.cc/content/feature/what-ftp-7-key-facts-about-major-training-metric-268471?amp

https://www.trainingpeaks.com/blog/power-training-levels/ 

https://www.healthline.com/health/vo2-max#about-vo₂-max


What I Learned About Heart Rates & Training

April 21st, 2022 by JoAnn Cranson

By:  Christina Vipond

Before I started racing, I used a bicycle computer to tell me how fast I was cruising and how many miles I had ridden. I never wore a heart rate monitor. When I started racing, I began wearing a heart rate monitor, using a power meter and using Zwift for off season training. My data showed my heart rate would quickly pop up to the 180s and even into the 190s during hard efforts. According to exercising heart rate zones, 220-your age, my max heart rate should only be 175. 

I was amazed at the number of people who looked at my heart rate during rides (on STRAVA or Zwift) and commented on the numbers; “Look at your heart rate!” “Why is your heart rate so high?”  Several people had advice for me, I heard “you haven’t trained enough” (8000 miles a year apparently isn’t enough training), “you are overtrained”, “you are working too hard”, “your heart rate shouldn’t be that high”, “you should go to the doctor to get that checked”. I was assured that my heart rate is just naturally higher when I am riding. Still, I would question how I felt when I was riding with a heart rate of 183. I was definitely working but I didn’t feel like I was going to pass out. I was also embarrassed as others would say, “man, my heart rate is only 130”. 

I am now into my third year of training and racing. My heart rate still pops into the 180s with hard efforts. As I was researching “normal” heart rates, I had the opportunity to talk with Mark Olson, Athletic Mentors co-founder and expert in the field of strength and conditioning.  I was relieved to hear we have similar heart rates. He explained heart rates are very individual and that there shouldn’t be any comparison to anyone else’s heart rate.

Mark defined the lactic threshold heart rate for me. A simplified definition of Lactate threshold is the level at which the intensity of exercise causes lactate to accumulate in the blood at a faster rate than it can be removed, making it the border between low- and high-intensity work.  According to various research articles, lactate threshold for an untrained person usually coincides with 50-60 percent of VO2 max, ranging up to 85-95 percent of VO2 max for an elite athlete. Mark explained that the lactic threshold heart rate is how hard an athlete can ride for an hour.  The number is individual and should only be compared to that athlete. For example, if an untrained athlete does a test, trains then does the test again, it is expected the lactic heart rate will improve and increase. Once an athlete is trained, there will be little movement in the heart rate number.  He said that the lactic threshold heart rate is really an input number, the power created is the output number. The heart rate number alone is useless.

Together, we looked at my FTP (Functional Threshold Power) rides that I had done over the past 3 years to estimate my lactate threshold. The data from these tests showed that while my heart rate did not change at FTP, my power went up, reiterating that my heart rate number by itself is meaningless and that my training is improving my fitness.  This information has given me confidence and the ability to explain that my heart rate is okay to those who have shown concern. I also have insight to the reasoning behind, as well as the importance of training rides of lengths, power and cadence parameters. This information has piqued my interest in the “why” and “how” of training. There is still so much more for me to learn.


Barry-Roubaix Psycho Killer – 100 Miler – 2021 Race Recap

November 24th, 2021 by JoAnn Cranson

By:  Jared Dunham

Barry Roubaix is a uniquely Michigan festival of gravel that generally starts the season off. However, this year things were a little different. Due to rescheduling from COVID, we experienced the race in early October, just as the leaves began to change and Iceman prerides become a regular thing on weekends.

Barry has four distances to choose from, the 18-mile Chiller, 36-mile Thriller, 62-mile Killer, and 100-mile Psycho Killer. No matter the distance, Barry never shies away from a healthy serving of elevation on each route. However, the 100 miler has approx. 6,800ft of climbing and showcases the most remote two-track that Barry county has to offer. This was my first experience tackling the Psycho Killer, but after a year’s worth of long rides, I was confident in my abilities going into the event.

The morning of Barry had arrived, and I was indecisive on whether to wear a wind vest or only a jersey at the start line. On my warmup I opted for the jersey, additionally, I almost ran over a large raccoon. It was then 6:40AM, and the lights of about 243 riders could be seen on the streets of Hastings. If you know someone who is crazy enough to enjoy 100+ mile gravel rides, they were likely there on that October 10th morning.

While hilly, the beginning 35 miles remained tame, and were a prologue for the rest of the ride. Occasionally a hard effort was put in by riders at the front, but for the most part, a peloton of 50 or so remained together until we reached the first seasonal road. I didn’t get a chance to ride it, but I did walk through some of the portions of Two-Track and had an idea of what I was getting into.

Nearing the 35-mile mark, racers at the front of our group pushed the pace and I positioned myself in the top 10 leading into the first two-track. As predicted, we made a left onto Solomon Rd. and things went from Chiller to Psycho Killer. Everyone was riding/running up the sandy climbs and it went from a group ride to everyone for themselves at that point. A break of 5 riders occurred and I was 7th exiting this the first section of two-track. The next 10 miles or so were on and off seasonal road, and for a while I could still see the lead group off in the distance. Eventually, I caught up with Nicholas Stanko and we rode together in intervals. By intervals I mean he would get ahead on some sections, and I would catch up on others. The lead group eventually faded off into legend as we continued the ride.

Near Middleville, we were treated to 5 miles of ultra-smooth pavement, and only hit one red light while getting through town. At mile 47, Nick looked back and asked, “You think we can catch them?”. I, who was already having a hard time in his draft, replied, “I’m just going to see how long I can hang on,”. Not long after that, Tim Mitchell soloed up to us in aero position, setting a harder pace. I promptly fell off the duo, I had been pushing myself hard and knew that the last 18 miles were going to leave a mark. Looking back, there was no one as far as I could see. Consequently, I got back into a groove and rode solo. Mile 48, more seasonal road arrived, Tim and Nick were back in sight. Again, at certain portions of these roads, I would begin to catch up and in others, I would fall behind.

At mile 60, we hit the infamous Sager Rd. No, I’m not talking about the normal edition of Sager Rd. This is the Big Papa to the normal portion of Sager. More sand, more climbing, and more descending. At the end of the “road”, two huge, unavoidable mud puddles lay before me. I must thank Nick Dehaan for pointing out that you can run alongside the first puddle. I’m well-versed in drivetrain issues so I figured it was a better option to walk the first puddle and run through the second.

Returning to classic Barry gravel, I was now very much solo. At mile 65, I had to stop at the Otis Lake aid station. The plan was to bring enough water to not stop. However, one of my three water bottles shot off my bike frame on the first two-track, and the water bladder in backpack had questionable motives. By that I mean it was leaking onto my right leg the entire time. Keegan pointed out at the end of the race that it looked like I had either crashed or was having an allergic reaction (I had been drinking red Gatorade). Some of the kind volunteers topped me off with fluids and I also grabbed a few Clif Bloks shots. Exiting the aid station, Keegan Korienek and Scott Quiring caught me. We were then a trio, and with no seasonal road between us and the finish, it was full gas for the remaining 40 miles.

If I had to guess, I would say that it was about mile 70 when Benjamin Meer and Adam Hockley caught up to us. Unfortunately, not long after this, Adam had a flat rear tire and stopped for repairs, so we were then a group of four. With 30 miles to go, I was at the edge of my limits. On the turns, I had to push hard to stay with the group and when it came time to take a pull, my legs didn’t want to obey. The thought repeatedly crossed my mind that I should just let the group go and ride my own pace. However, while things seemed to be deteriorating, I affirmed that come hell or high water I would finish with the group.

With about 25 miles remaining, we found Nick Stanko, who informed us that there were 6 riders ahead. There were 5 cyclists in the group, someone would not be on the podium in a few hours. The following 20 miles were a lot more hills and as crazy as it might sound, I felt myself recovering a bit after 95 miles in the saddle.

Keegan, Scott, and I had a promise that no games would be played till the last 5 miles. We all kept to that promise.

3 miles to go: Ben made a small break on a flat section of gravel. Nick soon followed his wheel. Scott put in an effort to try and catch the pair. In the previous two miles, I felt cramps coming on and knew my legs were toast. I came around Scott to try and close the gap between us and the pair.

2 miles to go: Try as I might, I couldn’t bring them back and as we began descending the last gravel hill and onto the pavement, Scott came around me and I hopped on in his wheel. The order was then: Nick, Ben, Scott, Me, and Keegan. On pavement, we motored down a long descent to catch Nick and Ben. Scott was unable to close the gap, and the other two were just a few bike lengths ahead. I came around and Keegan was the one to finally seal the deal and close the gap. At that point we made our last right hand turn onto more pavement.

1 mile to go: I felt myself slipping from the group, someone from the Thriller rode up next to me saying, “Come on let’s get ’em big guy!”. That was all the motivation I needed.

This was it. The culmination of 104 miles of Gravel, Two-Track, Pavement, Grit, and Some Luck. We were in the home stretch. The group was silent now and the only noises besides cheering spectators were bike chains running over gears and rubber on pavement. Off in the distance, the sound of music and the announcer slowly drew closer.

??? miles to go: I was riding in the drops behind Scott, at the tail end of the group, as the countdown to the final sprint ticked away. The order of the group was Nick, Ben, Keegan, Scott, and Myself. I Can’t remember who it was that started the sprint but when the dust had finally settled, the order was: Keegan, Nick, Ben, Scott, and Myself.

Not sure how it happened, but I had taken 10th place. Maybe because Scott had crossed the starting mat before me and I had then caught up to him, but was the last one over the finish line of our group. Either way, I was absolutely floored to be able to finish the ride the group.


Hunter Post

June 3rd, 2021 by Athletic Mentors Staff
Posted in:

Hart Hills Gravel Grinder

May 10th, 2021 by JoAnn Cranson

By:  Christina Vipond

This was my first opportunity to race Hart Hills The Classic Gravel Road Race. I have never ridden this course in previous years and since it was a last minute addition, there wasn’t time for a pre-ride. That may have turned out to be a good thing.

I did look at the profile on Strava so I knew there was 3000 feet of climbing that included a long, steep climb about 40 miles into the 55 mile race. I did a quick look at the route but figured it would be marked well so no need to study or download it onto my computer. 

I did a pre race ride the day before from my home and noted how hard the wind was blowing. The weather report indicated there would continue to be 10 mph winds with gusts the next day. Hills and wind, no problem.

Jonathan Meyer, Terry Ritter, Jared Dunham, Christina Vipond

Race day! I arrived in Hart around 8 am to get my packet and to get a good warm up ride in. I rode the finish of the course, which was pavement with some small rollers and downhill to the finish line, much better than a climb at the end. 

The 55 mile racers lined up for a mass start at 10 am. The organizer, Raymond Passchier, was making announcements about how the rain did not help the road conditions as they had hoped for. He was also announcing sand at mile 23, a large pothole at mile 32 so stay to the left, and a couple of well marked areas of “rough road”. I was trying to keep mental notes. We started downtown, made a few quick turns, and we were climbing gravel in no time. The wind didn’t seem too bad and the temperature warmed up enough to be comfortable.  Then the fun really started.

It only took a couple more turns and we were riding into a strong head wind. No problem, just stay on a wheel, there can’t be a headwind the entire ride. Another turn onto a seasonal road and the thought of “hang on, there is some sand”. I managed that area of sand and was thinking back to the pre-race course announcements, I wasn’t even close to mile 23 yet. Another turn and more sand, and wind, and climbing. Finally, a stretch of true gravel road with a break from riding through the sand, except now there was a cross wind that was blowing the bike all over the place. 

I have difficulty grabbing food out of my vest pockets so I was told about the “lick em and stick em” trick for Clif cubes. I decided to try it for this race, two rows of cubes on the tube, ready to give a burst of energy. I quickly learned two rows is not a good idea, a couple fell off in the first few miles but overall the trick was working, at least for the first hour. 

By the second hour of the race, the remaining cubes were coated with dust. The wind continued with strong gusts. The sand continued to be constant as well. I was riding a section of gravel road which was pretty much loose sand when I saw a man getting his mail from his mailbox. He looked at me and smiled. I told him I didn’t know I was going to have so much fun riding today. He responded with, “You are a long way from Hart”.  This was followed by a short section of pavement which felt so nice to just ride without sand and gusting winds. Then I saw the sign for a sharp right turn. As I got closer, I saw it wasn’t just a sharp turn, but a downhill turn onto a washed out, sandy two-track. I started laughing and asked the volunteer “seriously?” He had a funny smile and shrugged his shoulders. 

Somewhere during the third hour of the race, I crested a hill and saw a big pothole, there was no choice but to stay to the left just as the race director had announced. The wind was still gusting when I hit some rollers and barely felt like I was moving going downhill. I was pretty sure I was going to get blown back up. There was another sandy two-track that I was not able to navigate cleanly and had to get off the bike. I grabbed the tube, completely forgetting about the cubes and knocked the remaining 4 into the sand. There was a brief thought of “I should grab those” before coming to my senses. I was near the 40 mile mark and expecting to turn onto a gravel road for the long, steep climb I had noted from the road profile. I rounded a corner on the seasonal road and, of course there it was, not on a gravel road.  

2nd Place Overall Women

I had only 10 miles left and I knew the last few were pavement and downhill. I was excited to hit pavement with about 8 miles remaining. But there was that gusty crosswind and an open farm field, which put me in a complete dust out for a few seconds. A little more gravel and then pavement I recognized from the warm-up ride! I was ready for the downhill finish but one more gust of wind made me stop riding completely because it was pushing me into the lane of an oncoming truck, Mother Nature exerting herself one last time. 

Three hours and 39 minutes of hills, wind and sand! Hart Hills The Classic Gravel Road Race 2021 was the most challenging course I have raced yet. It was also the course that made me laugh the most. Raymond and all the volunteers did a fantastic job.  I know what to expect from this race next year!


Garmin MTB Power Pedals – Rally XC100

April 4th, 2021 by JoAnn Cranson

By:  Collin Snyder

These days, there are countless products out there to measure power. Each type has their own pluses and minuses. Pedal based powermeters have become more and more common over the past five years, although has been mainly targeted towards road bikes. This year, the German company SRM and Garmin have brought this technology to mountain bikes, both using a Shimano SPD style XC pedal. The big benefit of a pedal based system vs a crank based system is it is very easy to swap from bike to bike. With two mountain bikes, a fat bike, and several cyclocross bikes, this benefit is very enticing for me. Earlier this week, I was able to purchase a single sided version of the Garmin XC mountain pedals known as the Rally XC100

Here is my initial review

First, pairing was without issue using a Wahoo head unit. It quickly found the ANT signal, and once it was detected, I was able to change the crank length which defaults to 172.5mm. If your cranks are any other length, this must be changed for accurate power numbers. The instructions right out of the box are a little thin as they are mainly just pictorial based. It didn’t give great instructions on how to calibrate. Stages requires the crank to be at 6 o’clock, other powermeters just need the cranks to be still, and older powertaps had to have the cranks spin backwards during the calibration. Googling calibrating the older Garmin Vectors came up saying just calibrate when nothing is touching it. Hitting calibrate the first time, it just kept giving the “calibrating” message for about 30 seconds followed by calibration failed. I hit retry and it calibrated almost instantly, said torque offset 0.0.

Power side with LED indicators

Right out the driveway/down my dirt road, the numbers seemed inflated quite a bit. The numbers were right around my threshold power which normally I can’t hold until I warm up for a little bit. Fast forward a few minutes and I got stuck at a light. When the light turned green, I did a hard acceleration which was easier than an all-out sprint, my power was in excess of 1000 watts…which unless every other powermeter I’ve owned has been lying to me, wasn’t right.

Adjustable release force

However, after about 5-10 minutes, the numbers seemed to settle down and were much more believable. The rest of the ride was uneventful. I rode about a 50/50 mix of road and trail. Anyone expecting useful info on a twisty single-track, will be disappointed. Like the mtb powertap and older stages I’ve owned in the past, numbers on the trail are either 500-700 watts or zero. When you get done and look at your average power for a really hard lap, you will surely be underwhelmed. Your average power will probably be only 60-75% of what you could hold on the road for the equivalent time. Power on the mountain bike is really for all that time spent riding to and from the trail unless you are somewhere that has long sustained climbs or long open stretches.

After the ride, one notable oddity was the max power for the ride was severely inflated. It said my max power was around 1300 watts, about 300-400 higher than I will see in an all-out sprint. Comparing my power/time graph, the 1-2 second power was the only thing that was out of whack compared to historical data.

Ride two was a little more mundane. I recalibrated before the ride. Again, it failed calibration the first time, but when I clicked retry, it gave a successful message. Out the door, power numbers appeared normal/believable. I rode the 4-5 miles to the trail head, did a hot lap of my local trail, and rode home. Once again, my max power was super high at 1500ish watts. I suspect that a single rouge spike is causing the issue. Your 1 second power is a worthless figure, so I am not concerned over these spikes. If the main numbers stay inline, then I am not worried.

The Garmin Rally XC100 are available now from your local bike shop for an MSRP of $699. For dual sided power, the XC200 are available for $1200.

Special thanks to Sweetbikes in Canton Michigan. In these times, support your Local bike shop.


Night Riding Tips

October 2nd, 2020 by JoAnn Cranson

By Ross DiFalco

As the days get shorter and cooler, you might find yourself coming home from work in the dark without the ability to ride outside. Instead of relegating yourself to the indoor trainer, you do have another option. You can learn to ride in the dark. For the uninitiated, riding in the dark may sound crazy and scary, but it doesn’t have to be.

Where to start

You will need a good set of lights. I recommend getting a helmet mounted headlight with an external battery. If you have a spare helmet, I find it beneficial to keep the light mounted so it’s one less hurdle. Get one with greater than 1000 lumens that can run for a minimum of two hours. When you test a light, it might seem bright, but while you are riding it will seem much less so. Brighter is better, with a long beam distance being very important. You also should have a backup light on your handlebar for a “just in case” moment. There should be two rear facing lights as well. I like a very bright seat post strobe light and a helmet strobe light. The name of the game is being seen and being able to see.

Once you have your lights and have charged them, it’s time to select your bike. If you are like many cyclists, you probably have a bike for every niche around. For night riding I highly recommend using a mountain bike. Having flat wide handlebars, an upright riding position and wide tires/suspension all act as a pothole security policy. Potholes sneak up on you and it would be bad to crash in the middle of the night. If in case you do crash, ride with your phone charged. Before you head out the door, tell someone where you are going and how long you will be gone.

Let’s get riding!

Choose a route that has minimal traffic, and preferably slow traffic. I really like riding through neighborhoods, dirt roads, paths, and rail to trails. I avoid riding on sidewalks and roads with minimal shoulders. It’s very similar to riding in the light, those areas tend to pose the greatest risk to cyclists. Do be aware that a bright helmet mounted light can blind drivers so be cognizant of where you look. Another word of caution, deer are much more active at dawn and dusk. Watch out for deer that might hop out in front of you.

Take it slow, get used to the feeling of riding in the dark, and enjoy the differences. I am a cyclist that loves to get outside and be in nature. If I can ride longer outside and avoid my trainer, I will gladly do so. If you are like me, give riding in the dark a try! It’s an exciting feeling to glide through the night in the chilly fall air.


SPONSORSView All


Team Athletic Mentors
© 2024 - Team Athletic Mentors